


I've lost my cooking mojo, and it's getting to be a serious problem. As classes started last month, I knew that I would be a lot busier and would have to plan quick meals most nights. Not a big deal, I've made plenty of good food that doesn't take long to prepare. But soon after, I lost the desire to cook anything new. I've decided that it's because everything else in my life is new (job, city, friends, life) and I needed something to stay consistent. So I ate things like roasted chicken and lasagna for a few weeks because they were comforting and familiar. No big deal, I figured my desire to experiment would come back. And to some degree it has. But now every time I try a new recipe, it's virtually inedible (sometimes due to a kitchen disaster and other times it just tastes bad). Like tonight I thought I would make a sweet potato, wild rice, and fresh fig stuffing. I had two big sweet potatoes that I threw in the oven to bake. A few minutes later I was convinced by the smell of things that my apartment was burning down, but couldn't see any smoke or flames (and don't worry, the mouse that has made a home in my cabinet wasn't in there). Once the potatoes were tender, I realized that one had a tumor-like substance all the way through it (perhaps responsible for the smell??). So, I only had half of the amount of sweet potato that I needed. I'm not sure if that was the problem or if it was a bad recipe, but I took one bite and immediately put it away (somehow I've deluded myself into thinking that it will magically be better tomorrow). So I'll probably revert back to the old comfort foods for a while (most of which are somewhere on this blog already). That also means that you won't be hearing much from me for a while.
I'm hoping that once I move, I'll be so excited to spend time in my new kitchen that I'll get out of my funk. Yep, that's right, I'm moving again. Assuming there are no disasters with the inspection or appraisal (*fingers crossed*), I will own my very first house in the next couple of months. Oh yeah, add "buying a house" to the list of new things in my life.
The good news is that everything else in my life is going very well (hey, I can't have everything, right?). And truth be told, I would rather enjoy my job than be a great cook. Part of the reason I created this blog was to escape from a less than pleasant situation, and it's nice not to have to do that anymore. But stay tuned, because I'll be back one day soon, and I'll probably have better photos because I'll have lots of natural light in the new kitchen :).
Monday, September 20, 2010
Sunday, August 15, 2010
Weekend Herb Blogging #246 recap

Janet from The Taste Space gives us a recipe for Lebanese Eggplant with Pomegranate Molasses (Batinian Bil Rumman), a very versatile dish using pomegranate molasses and seeds:
")
Rachel from The Crispy Cook found a creative way to use up some of her zucchini and made Bread and Butter Zucchini Pickles:

Stash from The Spamwise Chronicles tells us more about okra (one of my favorites!), and gives us a recipe for Okra, Shrimp, and Tomato Curry:

Anna from Morsels & Musings tells us about a Spiced Cherry Pie that she made for her dad's birthday:

Soma from eCurry tells us about a popular chilled soup in India, Aamer Ombol - Chilled Green Mango Soup or Cooler:

Oz from Kitchen Butterfly tells us about picking blackberries (a sometimes painful undertaking), and several ways to use the berries, including a Blackberry Granita:

Haalo from Cook (almost) Anything at Least provides a unique way to use spaghetti squash in her recipe for Stir-fried Spaghetti Squash with Pancetta and Leek:

And finally, I contributed a recipe for fig gelato:

Thanks to everyone who submitted entries this week and, as always, thanks to Haalo for organizing this event. Next week Marija from Palachinka will be hosting, so check out the rules and send her your entries.
Thursday, August 12, 2010
Fig gelato recipe


Fig gelato (adapted from About.com)
(Printable version)
1 lb fresh figs, stems removed (you can peel them if you want, but I didn't)
juice of 1 lime (next time I'll only use half)
1/2 cup milk
1 Tbsp honey
Combine the figs and lime juice in a blender and blend until smooth. Then add milk and honey and blend briefly, just until combined. Freeze in an ice cream maker, according to manufacturer's directions. Serves 3-4.
Monday, August 2, 2010
Light summer squash casserole recipe

Light summer squash casserole (adapted from Vintage Victuals)
(Printable version)
1 1/2 pounds yellow summer squash, sliced thinly
1 small onion, chopped
1 egg, beaten
1 Tbsp butter
pinch of salt
freshly ground black pepper
Bring water to a boil in a medium saucepan, then add squash and let cook until it's tender (about 10 min). Drain the squash and return it to the pot. Then add the onion, egg, butter, and salt and pepper, and mix well. Pour mixture into an 8x8 baking pan and cook at 375 for 45-60 min, until the edges are brown. Let cool for 10 min before serving. Serves 2-3.
Thursday, July 29, 2010
Georgia food adventures
You're probably tired of hearing me talk about all of the wonderful food I've been enjoying since the move. Too bad, because I have to share more. One of my favorite luxuries of living near Atlanta is being able to make occasional trips to the Dekalb Farmers Market. I remember stumbling into this place while I was in college and being completely blown away. The name is misleading because it's not your typical farmers' market, it's more of a store... but unlike any store I've ever seen. It does have tons of produce, some local, some not so much (at least everything is very clearly identified). But my favorite two sections are the grains and spices. They buy everything in bulk and then package it themselves, so their spices are incredibly cheap (some less than 10% of what you would pay in a typical store). And they have every grain I've ever heard of (including sorghum, not that I have any desire to buy any). The meat, seafood, and cheese sections are amazing, too, but I'm usually too cold to stay long once I get to those sections (I'm pretty sure they keep the store at around 50 degrees, and I can never remember to bring extra clothes). Every time I go to this place, I leave with a huge smile on my face. Not only is it a fun shopping experience, but it's so cheap (but incredible quality) that I always feel like I've won something.
Unfortunately they don't let you take photos in the store (I can't figure out why), but here's what I got:
 Notice the plethora of grains (in the tall, stacked containers and the bags in front) and spices (the short containers). I tried to control myself because I went two days before I left for Toronto, so I couldn't buy many perishable foods.
My favorite part about the produce section is that I've never heard of about a quarter of the items they sell. It's the perfect place to find strange ingredients for recipes, but I'm also excited about trying something new each time I go. This time I didn't go too crazy, but I decided that I needed to finally eat a dragon fruit. The descriptive sign above them went into detail about their laxative effects, so I was a bit hesitant about eating it the night before my trip, but I was brave and suffered no consequences. I really enjoyed it, and was excited to see some at the opening reception at my conference a mere two days later.

My favorite part of my new food adventure has been enjoying all of the fruits and veggies from my grandma's garden. I have an amazing family (and am completely spoiled), and my mom and great aunt and uncle pick food specifically for me whenever Mom will be making a stop by my place on her way home from Grandmother's house. It might not be that exciting for those of you with great gardens, but it's wonderful when you're stuck in an apartment with no place to grow anything. Here's what Mom brought last weekend:


Plus I have more blueberries, but I forgot to take a photo. How can you be sad when your dining room table is filled with amazing produce? I going to experiment with drying some of the figs in my oven this weekend - does anybody have any tips?
And to top it all off, I had the experience of my life the other day. Every year my grandparents would take a field trip to Dickey Farms in Musella, GA. After hearing tons about this place, I convinced one of my friends that we should venture out there, and now I completely understand why they love Dickey Farms. It's not a huge operation, but I was mesmerized by the washing/sorting/packing machines. If you go in the middle of the day, you will find dozens of retired people sitting on the porch in rockers eating peach ice cream. And if you go out back, little old ladies are frantically piling the "reject" peaches into 1/2 bushel boxes. While we were there, a church van pulled up with tons of excited ladies, and I can only imagine the pies and cobblers that they made when they got home. We happily joined in to fill our box for only $5. Yes, you read that right. Five dollars. And we had well over 30 pounds of peaches in our box. The entire process was fun - I was trying to catch the peaches as they flew off the conveyor belt (but felt like Lucy in the chocolate factory). Many of the "rejects" had a soft spot, but plenty were fine - just too ripe to ship to stores. We split the box, but I was still exhausted after freezing my half. A big part of me wants to go back next week, but I'm not sure what I would do with more peaches.
Somehow between shelling beans and going to the peach farm, I've been able to get a lot of work done in preparation for my fall classes, but that's less fun to talk about :). Have any of you had an exciting food adventure recently?
Unfortunately they don't let you take photos in the store (I can't figure out why), but here's what I got:

My favorite part about the produce section is that I've never heard of about a quarter of the items they sell. It's the perfect place to find strange ingredients for recipes, but I'm also excited about trying something new each time I go. This time I didn't go too crazy, but I decided that I needed to finally eat a dragon fruit. The descriptive sign above them went into detail about their laxative effects, so I was a bit hesitant about eating it the night before my trip, but I was brave and suffered no consequences. I really enjoyed it, and was excited to see some at the opening reception at my conference a mere two days later.

My favorite part of my new food adventure has been enjoying all of the fruits and veggies from my grandma's garden. I have an amazing family (and am completely spoiled), and my mom and great aunt and uncle pick food specifically for me whenever Mom will be making a stop by my place on her way home from Grandmother's house. It might not be that exciting for those of you with great gardens, but it's wonderful when you're stuck in an apartment with no place to grow anything. Here's what Mom brought last weekend:

(okra, butter beans, millions of tomatoes, and butternut squash)

(a mess of green beans)

(figs galore)
Plus I have more blueberries, but I forgot to take a photo. How can you be sad when your dining room table is filled with amazing produce? I going to experiment with drying some of the figs in my oven this weekend - does anybody have any tips?
And to top it all off, I had the experience of my life the other day. Every year my grandparents would take a field trip to Dickey Farms in Musella, GA. After hearing tons about this place, I convinced one of my friends that we should venture out there, and now I completely understand why they love Dickey Farms. It's not a huge operation, but I was mesmerized by the washing/sorting/packing machines. If you go in the middle of the day, you will find dozens of retired people sitting on the porch in rockers eating peach ice cream. And if you go out back, little old ladies are frantically piling the "reject" peaches into 1/2 bushel boxes. While we were there, a church van pulled up with tons of excited ladies, and I can only imagine the pies and cobblers that they made when they got home. We happily joined in to fill our box for only $5. Yes, you read that right. Five dollars. And we had well over 30 pounds of peaches in our box. The entire process was fun - I was trying to catch the peaches as they flew off the conveyor belt (but felt like Lucy in the chocolate factory). Many of the "rejects" had a soft spot, but plenty were fine - just too ripe to ship to stores. We split the box, but I was still exhausted after freezing my half. A big part of me wants to go back next week, but I'm not sure what I would do with more peaches.
Somehow between shelling beans and going to the peach farm, I've been able to get a lot of work done in preparation for my fall classes, but that's less fun to talk about :). Have any of you had an exciting food adventure recently?
Sunday, July 25, 2010
Trinidadian chicken curry recipe

I've been extraordinarily happy with every one of Ree's recipes that I've tried (especially the peppers and mushrooms I made for Mom's birthday party last month), so I had faith that this wouldn't disappoint me. I was correct. As soon as I smelled the marinade, I knew this would be delicious, and it only got better from there. This dish has bold flavors, and I never would have thought of the combination of mustard, pico de gallo mixture, and curry powder. This will definitely become one of my staple dishes, especially when I'm cooking for meat lovers (Dad, this means you).
Trinidadian chicken curry (adapted from The Pioneer Woman)
(Printable version)
1 1/2 pounds chicken (I used boneless, skinless breasts, but any skinless cut will do)
sprinkle of salt
2 tsp yellow mustard
1 tomato, quartered
1 onion, halved (and divided)
2 handfuls of cilantro
5 garlic cloves
freshly cracked black pepper
2 Tbsp curry powder
2 tsp turmeric
3/4 cup water
1 Tbsp olive oil
Sprinkle the chicken with salt, and rub it with the mustard. Combine the tomato, half of the onion, cilantro, garlic, and black pepper in a food processor and pulse a few times until the veggies are very finely diced. Pour this mixture on top of the chicken, mix well, and let the chicken marinate for at least 2 hours.
When you're ready to cook the chicken, mix the curry powder, turmeric, and water together in a small bowl. Heat the oil over medium heat in a large saute pan, and then stir in this spice/water mixture. Continue stirring until the sauce thickens and turns darker (about 10 min). Then dice the other half of the onion, and saute it in the sauce until tender (about 5 min). Next, add in the chicken and all of the veggie marinade, loosely cover the pan, and cook for 5 min. Stir everything around in the pan, cover, and continue to cook for 20-25 min, stirring occasionally, until the chicken is done and the sauce is thick (you can remove the cover for a few minutes if the chicken is done before the sauce thickens). Serves 4.
Friday, July 16, 2010
Maque choux with sausage recipe

I've made maque choux before, and I have to say that I think I liked the other version better for one simple reason. The bacon is essential. The sausage is great, but it doesn't permeate the vegetables like bacon does. So if you make this, please cook the vegetables in bacon grease and then crumble the bacon on top at the end (and maybe use a little less sausage than I did). One slice will do, and it will make all the difference. Or, if you want to stick with this recipe, use amazing sausage (something like the medium or hot sausage from Bradley's Country Store in Tallahassee). I'm not saying this wasn't good as is (it's hard to go wrong with fresh homegrown veggies), and I'm still enjoying the leftovers, but I learned an important lesson.
Maque choux with sausage (adapted from Southern Living)
(Printable version)
14 oz. spicy smoked sausage (I used turkey sausage), diced
1 small onion, chopped
1 small green pepper, diced
2 garlic cloves, minced
2 cups sliced okra
kernels from 4 small ears of corn (about 2 cups)
3 tomatoes, chopped
salt and pepper to taste
Brown sausage pieces in a large skillet over medium-high heat. Then stir in the onion, green pepper, and garlic and saute until tender (about 5 min). Add okra, corn, and tomatoes, reduce heat to medium-low, and cook for about 10 min, stirring frequently. Season with salt and pepper to taste. Serves 4.
Sunday, July 11, 2010
Blueberry and fig smoothie recipe

While I was still recovering today, I decided to make a smoothie. I was drinking smoothies almost every day before I left Michigan, and I'm very excited to be reunited with my blender. It was also perfect timing because today I got blueberries and figs from my grandmother's garden. I don't typically think of blueberries and figs as a good match, and I was planning to make a blueberry and peach smoothie, but I decided to give my body a brief break from peaches (I've been eating about 5 a day) and try this weird combo. To my surprise, I really liked the flavor. It was more subtle than the smoothies I usually make (I might try adding more fruit, especially blueberries, next time), but was incredibly good. I usually use yogurt in my smoothies, but I didn't have any and substituted milk. One of the primary reasons I love smoothies is that you can practically throw anything into a blender and it turns out great, and this was the perfect example.
Blueberry and fig smoothie
(Printable version)
1/2 cup milk or plain yogurt
1/2 cup blueberries
4 large figs, stems removed
2 handfuls of ice
Add all ingredients to the blender, and blend on high until the ice is all pulverized. Serves 1-2.
Tuesday, June 22, 2010
Carrot macaroni and cheese recipe

It should be no surprise to you that I crammed vegetables into mac and cheese, and this worked wonderfully. I really liked the way that the carrot blended with the cheese to make a hearty sauce that wasn't too heavy. It was sweeter than your typical version, but it wasn't too much, and I thought it was a nice change. However, unlike normal mac and cheese, I didn't enjoy the leftovers cold (I know I'm weird...), so make sure you warm it up.
Carrot macaroni and cheese (adapted from Food & Wine)
(Printable version)
12 oz. carrots, sliced thinly
1 large orange, zested and juiced
1/2 cup water
salt and pepper to taste
8 oz. chunky brown rice pasta (penne, fusilli, etc.)
3 oz. sharp cheddar cheese
Combine carrots, orange zest and juice, and water in a small saucepan, cover, and let simmer over medium heat until carrots are tender (about 30 min). Let the carrots cool for a few minutes, and then puree them in a blender with salt and pepper (you may need a little bit more water to make a thick puree).
Cook the pasta according to package directions (make sure to stop when it's al dente), and reserve about a cup of the water before draining the pasta. Add the pasta back to it's cooking pot, stir in the carrot and reserved pasta water, and let cook over medium heat for 5 min. Then add 2/3 of the cheese and stir well. Spread pasta out in a 8x8" baking pan and top with remaining cheese. Bake at 350 for 20 min. Serves 4.
Friday, June 18, 2010
Hello again!
Wow, it's been a while. Between finishing up things in the lab, packing, and trying to see everyone before I move next week, I've been quite busy. Plus, last weekend I went to Florida to throw Mom a surprise birthday party. I think I cooked more for the party than I have at home in the past month (I've been living off of the cooked grains and beans from my freezer). I made two cakes: a flourless chocolate cake that was rich and delicious, and an Italian cream cake (apparently it was so good that Mom asked me to make another one while I was home, and I've been informed that I'm making it for a family reunion). For the last few years almost everything I've baked has been gluten-free with very minimal sugar, so it was incredibly easy not worrying about either (the chocolate cake was gluten-free, though). The other favorites at the party were the stuffed mushrooms and bacon-wrapped jalapenos, both from The Pioneer Woman.

I have a couple of recipes that I'll hopefully get around to sharing in the next week or so, but I doubt I'll be cooking much in the next couple of weeks because I'm planning to pack my kitchen this weekend, and I have no idea how long my belongings will be stuck on a moving truck somewhere between Michigan and Georgia. After that, hopefully I'll be able to share all kinds of concoctions (likely involving peaches and tomatoes... probably not together, but who knows!).
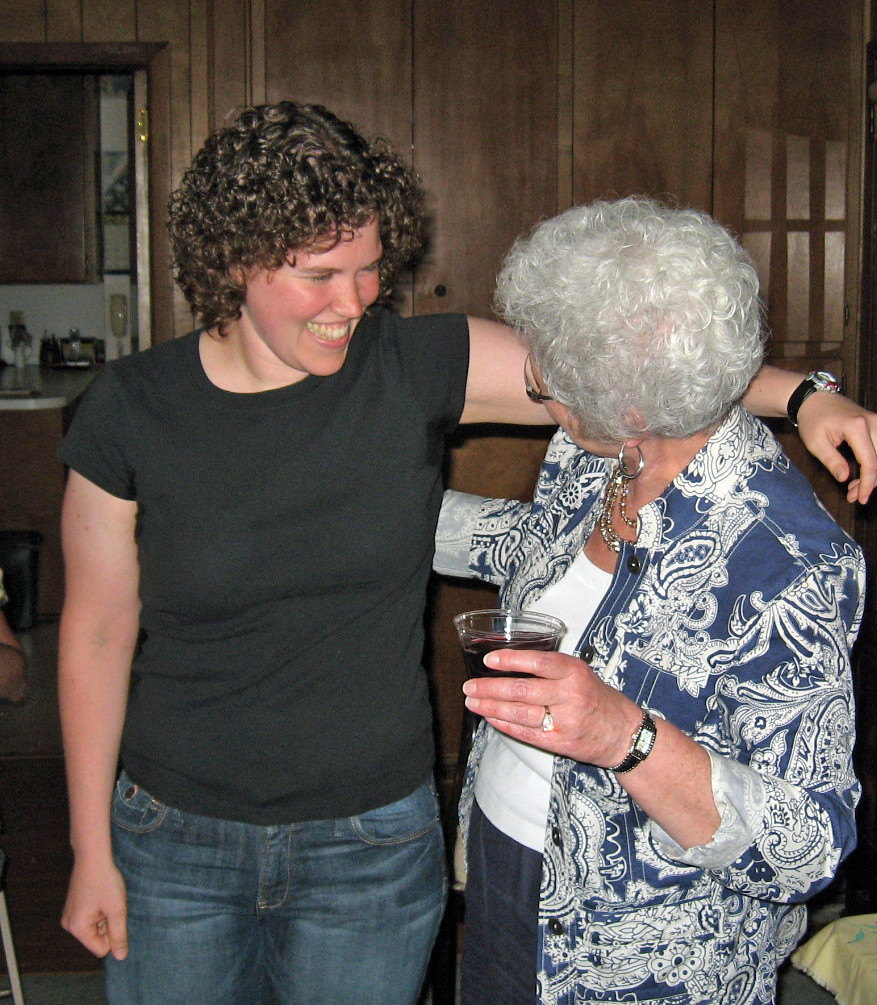
She didn't have a heart attack or spill her wine!!
I have a couple of recipes that I'll hopefully get around to sharing in the next week or so, but I doubt I'll be cooking much in the next couple of weeks because I'm planning to pack my kitchen this weekend, and I have no idea how long my belongings will be stuck on a moving truck somewhere between Michigan and Georgia. After that, hopefully I'll be able to share all kinds of concoctions (likely involving peaches and tomatoes... probably not together, but who knows!).
Wednesday, May 26, 2010
Two gluten-free granola bar recipes

Cocoa and orange granola bars (adapted from Anja's Food 4 Thought)
(Printable version)
1 1/2 cups rolled oats
1/2 cup chopped walnuts
1/4 tsp salt
1 tsp cinnamon
1 Tbsp cocoa powder
zest of one orange
3/4 cup dried fruit (I used half apricots and half currants)
1 1/4 cup orange juice (I would start with 3/4 cup and add more if necessary)
2 Tbsp honey
Combine oats, walnuts, salt, cinnamon, cocoa powder, zest, and dried fruit in a large bowl. In a separate bowl, stir together orange juice and honey. Pour the orange juice mixture into the dry ingredients and stir well. Let this sit for 15 min, and then add more orange juice if the mixture isn't sticking together. Spread this out on a parchment-lined baking sheet so that it's about 1/2" thick, and bake at 350 for 25 min. Then let cool and cut into bars. Wrap individually and freeze for long-term storage. Makes 20 bars.
Fig, raisin, and walnut granola bars (adapted from Simply Sugar & Gluten-free)
(Printable version)
2 cups rolled oats
2 Tbsp flax meal
6 Tbsp teff flour
1 cup chopped walnuts
1/2 cup dried figs, chopped
1/2 cup raisins
1 tsp cinnamon
1/4 tsp ground ginger
1/3 cup agave nectar or honey
2 eggs, beaten
water if necessary
Combine oats, flax meal, teff flour, walnuts, figs, raisins, cinnamon, and ginger in a large bowl. In a separate bowl, stir together agave nectar and eggs. Pour the agave mixture into the dry ingredients and stir well. If you need to moisten the mixture so that everything sticks together, add water a tablespoon at a time. Spread the mixture out on a parchment-lined baking sheet so that it's about 1/2" thick, and bake at 350 for about 20 min. Then let cool and cut into bars. Wrap individually and freeze for long-term storage. Makes 20 bars.
Saturday, May 22, 2010
Cabbage stuffed with quinoa pilaf recipe

Cabbage stuffed with quinoa pilaf (adapted from Gluten-Free Goddess)
(Printable version)
8 large cabbage leaves
1 tsp olive oil
2 garlic cloves, minced
2 cups cooked quinoa
15 cherry tomatoes, halved
4 green onions, chopped
3 Tbsp raisins
3 Tbsp toasted pine nuts
salt and pepper to taste
Bring a large pot of water to a boil, and then add cabbage leaves and boil until they're tender (about 5 min). Remove the leaves from the water and set aside to cool. While the cabbage cools, heat the oil in a large skillet over medium heat. Then add the garlic and saute for a minute. Stir in the remaining ingredients, season with salt and pepper, and let heat through for a few minutes before removing it from the burner. Then stuff each cabbage leaf with about 1/3 cup quinoa pilaf, roll the cabbage up tightly, and place it seam side down into a large baking dish. Bake at 350 for 20-30 min. Serves 4.
Thursday, May 20, 2010
Warm butter bean, red onion, and spinach salad with mustard recipe

Now the only problem is deciding how I want to use my last bag of butter beans. Do I make more of this salad? Do I try mashing them up like potatoes (an interesting idea I just read about)? Any favorite recipes out there?
Warm butter bean, red onion, and spinach salad with mustard (adapted from Gel's kitchen)
(Printable version)
1 Tbsp olive oil
1/4 large red onion, sliced thinly
2 1/2 cups cooked butter beans
salt and pepper to taste
2 large handfuls spinach
2 Tbsp whole grain mustard (I used one with horseradish)
Heat oil in a large skillet over medium heat, and then saute the onion until it's very tender (about 10 min). Add butter beans to the skillet, season with salt and pepper, and stir everything around for a couple of minutes. Then add spinach, stir well, and cook until the spinach wilts. Stir in the mustard and serve. Serves 3-4.
Monday, May 17, 2010
Brunswick stew recipe

But then last month I was flooded by recipes for Brunswick stew from the Daring Cooks challenge. Brunswick stew is a combination of Grandmother's vegetable soup and purlue stew. It has some kind of meat (typically beef, pork, or chicken along with some random other ones - sometimes squirrel or rabbit), butter beans, corn, potatoes, tomatoes, and sometimes okra. But that creamy tomato base is common among all of three of them (apparently to Burgoo as well, which I've never tried, but is basically Kentucky's version of this stew). I associate Brunswick stew with barbecue restaurants. If a restaurant doesn't sell Brunswick stew, don't eat the barbecue there. Trust me.
The influx of Brunswick stew recipes last month made me drool, and I'm trying to eat up the cooked butter beans I have in my freezer, so I had to make this, and boy am I glad I did. I don't know if this is the absolute best Brunswick stew I've ever had, but it's pretty close. I'm used to the Georgia-style stew with beef, so the chicken version (more typical of Virginia) was different but equally as enjoyable. If it follows the Rule of Soups and Stews (they get better and better as the days go by), I'll be in heaven all week. And even more exciting is that the base is the exact same creamy tomato base of Grandmother's vegetable soup. Forget the PhD, I'm far more proud that I've mastered the stew/soup base that I love so much!
Brunswick stew (loosely adapted from What We're Eating)
(Printable version)
2 strips of bacon
1 large onion, chopped
2 small peppers, diced (I used dried Thai chilies because that's all I had, but jalapenos or serranos are preferable)
2 1/2 pounds chicken thighs, skin removed
5 cups chicken stock
2 bay leaves
2 tsp Tabasco or other hot sauce
freshly ground black pepper
2 carrots, diced
4 small red potatoes, chopped
2 1/2 cups cooked butter beans
1 cup corn (fresh or frozen)
1/3 cup ketchup
1 large can (28 oz) crushed tomatoes
Cook bacon in a large soup pot over medium heat. When it's done, place it aside on paper towels and crumble it. Add the onions and peppers to the bacon grease and cook until the onion is tender. Then push the onions to the side of the pot, and add the chicken, making sure that it's touching the bottom of the pot as much as possible. Sear the chicken on both sides (a few minutes per side), and then add stock, bay leaves, Tabasco, and black pepper to the pot. If the chicken isn't covered by the stock, add more until it's almost completely submerged. Bring the stock to a boil, then reduce heat and simmer for 30 min. Remove the chicken from the pot and set it aside to cool. Then add carrots, potatoes, butter beans, corn, ketchup, tomatoes, and crumbled bacon to the pot. When the chicken is cool enough to handle, shred it and add the meat to the pot. Then bring the stew back to a boil, reduce heat to medium low, cover, and cook for 90 min, stirring occasionally. If the stew base is very watery, leave the cover off for a while so it can thicken, or add more stock or water if it's too thick. After the stew is done, mash the stew with a potato masher for a few minutes to create the creamy base. Taste and add more Tabasco if necessary, and remove the bay leaves. Serves 6-8.
Thursday, May 13, 2010
Fig, pecan, and flax crackers recipe

Fig, pecan, and flax crackers (adapted from life as a h4)
(Printable version)
1/3 cup flax seeds (whole ones, not ground)
1/4 cup almond or flax meal
1 1/2 cups gluten-free baking mix (or white or whole wheat flour)
1/2 tsp baking powder
1/4 tsp salt
1 Tbsp brown sugar
4 Tbsp butter, cut into small pieces
1/4 cup chopped pecans
1 cup dried figs, chopped
1/2 cup milk (or more, if necessary)
Combine flax seeds, almond or flax meal, baking mix, baking powder, salt, and brown sugar in a large mixing bowl. Using a pastry cutter or two knives, cut the butter into the mixture until the butter is in tiny pieces and well distributed throughout the flour/flax/etc. Add the pecans, figs, and milk to the bowl, and stir until everything is mixed well. If you're having trouble incorporating all of the flour into the dough, add milk a tablespoon at a time (I added about 1/4 cup more). Cover the bowl with plastic wrap and refrigerate for 10 min. Then divide the dough into two pieces and roll each piece into a log with a 2" diameter. Using a sharp knife, slice the log into 1/4" slices and place them on baking sheets lined with parchment paper (some of my crackers fell apart as I was slicing the logs, but I pieced them back together and it worked fine). Then bake the crackers at 325 for 20-30 min, until they are golden brown. Let them cool before serving or storing. Makes about 30 crackers.
Tuesday, May 11, 2010
Let's talk about sorghum
I'm guessing that a lot of people have had sorghum syrup at some point in their lives. And those of us who have adopted a gluten-free diet have almost surely had sorghum flour and sorghum-based beer. In fact, I use sorghum flour more than any other type because it seems to work as a multi-purpose flour and has a mild taste that is great in all kinds of baked goods. However, I hadn't seen sorghum grains until I received a bag of sorghum from Shiloh Farms as part of the first place prize package in the Whole Grains Council's photo contest last fall.
Sorghum grains are round, similar to millet or quinoa but much larger. The bag listed several cooking options, and suggested popping it. This intrigued me, so I immediately used my favorite method of making popcorn with the sorghum (put a handful in a paper lunch bag, roll the top over a few times, and cook in the microwave on the popcorn setting). It was good. Really good. It tasted similar to popcorn, with a slight millet-like quality. The only problem was that many of the kernels didn't pop, but I'm wondering if this could be remedied by cooking it on the stove.

I only had one bag of it, though, so I decided that I should resist popping all of it and try another cooking method. And then I forgot about it for 5 months. I recently rediscovered my sorghum while taking an inventory of my pantry in preparation for my upcoming move, and finally got around to cooking more of it. There was a recipe for sorghum pilaf on the bag, so I decided that was the route to take. But instead of following that recipe, I substituted my sorghum for quinoa in a pilaf with sweet potato, spinach, and bacon that I found at Sounding My Barbaric Gulp!. First, I must tell you that sorghum takes forever to cook (about an hour and a half), so I was hoping that it would be tasty enough to compensate for the time. And I was also hoping to share an amazing recipe for sorghum because I had an extraordinarily tough time finding anything online. The first few bites were good, very different, but pretty good. It had a much stronger flavor than it did when popped, very earthy I would say. But by the fourth bite I had had enough. I've been able to eat a bite here and there because I hate to throw away leftovers, but I can't take anymore.

So unfortunately I don't have a recipe to share, but do try popping it if you ever come across sorghum grains (that's what will happen with the remainder of my bag). And I bet this pilaf would be good with quinoa, as it was originally made. I'm disappointed that I didn't find my new favorite whole grain, and even more perplexed at how sorghum could be so great in other forms. It was a fun experiment, though!
Sunday, May 9, 2010
Rhubarb and strawberry compote recipe

Rhubarb and strawberry compote
(Printable version)
5 large stalks of rhubarb, chopped into 1/2" pieces
1 lb strawberries, tops removed and halved
1 Tbsp honey or agave nectar (to your taste)
Put the rhubarb and strawberries in a large saucepan and cook over medium-low heat, stirring occasionally. When the fruit has broken down significantly (after about 20 min), add honey or agave until it's sweet enough for you. Continue to cook for 10-20 more min. Makes about 2 cups.
Tuesday, May 4, 2010
Oat-crusted chicken recipe

Now that April is behind us, it's time to wrap up the cookbook of the month, Whole Grains for Busy People. Overall this is a fantastic cookbook if you're trying to ease whole grains into your meals or trying to cook whole grains with limited time. My favorite recipe was the turkey ragu I made last month. Even when I lost my appetite before my dissertation defense, I still wanted to eat it. I also really enjoyed the macaroni and cheese with chicken and spinach, thai fish curry, and this chicken (the night I made it). The hominy and bean chili wasn't my favorite recipe for chili, but it was pretty good too. None of these recipes are going to win awards, but they're tasty, healthy recipes, and will give you a satisfying meal at the end of a long day. If you have more time and only want to buy one book, I would recommend buying Lorna Sass's Whole Grains Every Day, Every Way, but this book is probably more suitable for most people who simply want a fast way to get healthy food on the table.
Oat-crusted chicken recipe (adapted from Whole Grains for Busy People)
(Printable version)
2 chicken breasts
salt and pepper
1/3 cup sorghum flour
2/3 cup rolled oats
zest of one lemon
1 egg, beaten
1 Tbsp olive oil
Season both sides of the chicken with salt and pepper. Spread the flour out on one plate, and combine the oats and lemon zest and spread on a separate plate. Pour the beaten egg into a wide, shallow bowl. Dredge each chicken breast in flour, then dip it in the egg, then coat it in the oat mixture. Heat the oil in a large skillet over medium heat. Brown both sides of the chicken (about 2 min per side), then cover the skillet, reduce heat to low, and let cook until chicken is cooked through (about 10 min). Serves 2-4.
Saturday, May 1, 2010
Gluten-free sweet potato cobbler recipe

(Un)fortunately, Al passed away last weekend. He found out about a week before that he had terminal cancer, and luckily didn't have to suffer very long. I made a last-minute trip down to Atlanta to see him (hence my lack of posting), but didn't make it in time. We were all as mentally prepared as possible, but that never seems to be enough. As we reflected on our memories of Al over the weekend, it always came back to food. Al loved to garden, he loved to cook, and he LOVED to eat. I remember spending summer mornings shelling peas and beans with Al and Grandmother in the basement. Al also taught me how to make pickles. Even when he no longer had energy to spend hours in the garden or kitchen, he would give me numerous tips on growing and preserving various fruits and vegetables (I now wish I had taken notes!).
Al also won me over with food. He and my grandmother got married when I was 6, and I think we first bonded over our love of eating. Before they got married, I was out in the yard with them (likely picking up pine cones, as that's Grandmother's favorite activity), and Al said that he had something for me inside. We went in and he handed me a few Bugles (you know, those horn-shaped corn chip things). Grandmother wasn't excited about this because she thought it would spoil my dinner, but Al explained that it was just a "sample," and samples don't count. Almost every time that I saw Al, one of us would make a joke about having a sample of something and the calories not counting (sometimes the sample would be a large piece of cake, but as long as we called it a sample, it didn't exist). I was hoping to bring Al a box of Bugles last week, but oh well.
Instead, I made a sweet potato cobbler today, because I know that's what he would want me to do. Instead of using his recipe, I made a gluten-free, low-sugar version. I made a small amount because I wasn't sure how it would taste, but I loved it. It was very different from Al's, but fantastic and still reminds me of him. Now I wish I had made a big pan of it!
Sweet potato cobbler (adapted from Gluten free Mommy)
(Printable version)
1 medium sweet potato, peeled and cut crosswise into 1/3" slices
1 1/2 Tbsp sorghum flour
1 1/2 Tbsp sweet rice flour
1 Tbsp almond meal
1 Tbsp tapioca starch
1 Tbsp potato starch
2 tsp sugar
1/4 tsp salt
1/8 tsp xanthan gum
pinch of cardamom
pinch of cinnamon
1 Tbsp butter, melted
2 Tbsp orange juice
3 Tbsp milk (more or less)
1 Tbsp lemon juice
2 tsp agave nectar
1 tsp vanilla
Cook sweet potato slices in boiling water until tender (about 7 min). Then drain the sweet potato and place it in a small baking dish (I used a 4 cup round Pyrex dish). While the sweet potato is cooking, combine flours, starches, sugar, salt, xanthan gum, and spices in a small bowl. Combine the orange juice and butter, and stir this into the flour mixture. Then add enough milk so that it is the consistency of muffin batter. Sprinkle the lemon juice, agave nectar, and vanilla over the sweet potatoes, and then top with spoonfuls of the batter. Bake at 350 until the dough is set and beginning to brown (about 30 min). Serves 2.
Thursday, April 22, 2010
Macaroni and cheese with chicken and spinach recipe

Macaroni and cheese with chicken and spinach (adapted from Whole Grains for Busy People)
(Printable version)
4 cups water
8 oz. brown rice macaroni (or other small pasta)
2 cups cooked, shredded chicken (I used boiled chicken thighs - about 3/4 lb.)
4 oz. shredded cheddar cheese (or up to 10 oz., depending on how cheesy you like your pasta)
1 Tbsp cornstarch or arrowroot starch mixed with 1 Tbsp water (if necessary)
10 oz. fresh spinach
freshly ground pepper
Bring the water to a boil in a large saute pan over high heat, and then stir in the macaroni and let it cook for a few minutes less than the package directs (I cooked it for 7 min), stirring frequently. Reduce heat to medium-high and add chicken and cheese, stirring until cheese is melted. If the sauce is very thin, add the starch and water mixture. Then add the spinach and continue to cook for a couple of min, until the pasta is tender and the spinach is wilted. Grind black pepper on the top. Serves 4.
Monday, April 19, 2010
Weekend Herb Blogging #229 Recap

Anna from Morsels and Musings submitted a Middle Eastern orange cake:

This cake sounds delicious, and is made with only a few ingredients. I was excited to find that it's gluten-free, too (it's made with ground almonds).
Tigerfish from teczcape - an escape to food tells us about Kaffir lime leaves:

This post includes great information about how to find, store, and use Kaffir lime leaves, and an example of a dish that uses them (Thai shrimp cakes).
Winnie from Healthy Green Kitchen gives us a recipe for Soft Oatmeal Bread:

This bread uses cooked oats, and sounds delicious!
TS and JS from [eatingclub] Vancouver give us a recipe for Quinoa Lentil Apple Salad:

This recipe sounds like the perfect combination of grains, legumes, and fruit.
Nina from My Easy Cooking contributed a recipe for Green Bean Stew:
 The stew includes lamb, potatoes, and green beans, and would be a great winter dish.
Nuria from Spanish Recipes contributed a recipe for Strawberry Gazpacho:
 In addition to step by step instructions for making the gazpacho, this post also includes information about the health benefits of eating strawberries.
Muneeba from An Edible Symphony tells us about a Vietnamese Avocado Milkshake:
 This milkshake sounds like it will be a great beverage for staying cool this summer!
Ben from What's Cooking? gives us a recipe for a Spring Mango Salad:
 This salad combines mangoes with a lot of fresh vegetables for a tasty-looking salad.
Cinzia from Cindystar submitted a recipe for White Chocolate Pudding:
 I can imagine any kind of fruit would be great with this pudding.
Yasmeen from Health Nut tells us how to make Pita Wedges with Green Almond Hash:

I've never tried green almonds, but this sounds like a perfect way to top pita bread!
Haalo from Cook (almost) Anything At Least Once introduces us to tazziberries and provides a recipe for Tazziberry Friands:
 I've never had tazziberries, but they sound like an interesting combination of all kinds of delicious fruits. These gluten-free friands sound like the perfect way to try them!
Joanne from Eats Well With Others contributed a recipe for Strawberry Yogurt Bread:
 This sounds like a great way to use strawberries as the begin to appear in the markets.
And finally, here's my contribution, a recipe for roasted butternut squash:

Nina from My Easy Cooking contributed a recipe for Green Bean Stew:

Nuria from Spanish Recipes contributed a recipe for Strawberry Gazpacho:

Muneeba from An Edible Symphony tells us about a Vietnamese Avocado Milkshake:

Ben from What's Cooking? gives us a recipe for a Spring Mango Salad:

Cinzia from Cindystar submitted a recipe for White Chocolate Pudding:

Yasmeen from Health Nut tells us how to make Pita Wedges with Green Almond Hash:

I've never tried green almonds, but this sounds like a perfect way to top pita bread!
Haalo from Cook (almost) Anything At Least Once introduces us to tazziberries and provides a recipe for Tazziberry Friands:

Joanne from Eats Well With Others contributed a recipe for Strawberry Yogurt Bread:

And finally, here's my contribution, a recipe for roasted butternut squash:

Thanks to everyone who contributed to WHB this week, and please let me know if I made any errors. Next week, Winnie from Healthy Green Kitchen will be hosting, so send your entries to her (see complete WHB rules).
Thursday, April 15, 2010
Roasted butternut squash recipe

Roasted butternut squash (adapted from Kalyn's Kitchen)
(Printable version)
1 medium butternut squash, peeled and cubed
1 Tbsp olive oil
1 Tbsp dried thyme
salt and pepper to taste
2 Tbsp freshly shredded Parmesan cheese (optional)
Spread the squash cubes out on a baking sheet, drizzle the cubes with oil, and sprinkle with thyme, salt, and pepper. Rub the squash around with your hands so that the cubes are coated in oil and the herbs/spices are distributed evenly. Roast at 450 for about 45 minutes, stirring occasionally, until squash is tender. Sprinkle squash with Parmesan if desired. Serves 2-3 (if you can resist eating it all in one sitting).
Tuesday, April 13, 2010
Thai fish curry with brown rice recipe

I would rather drink juice that I've squeezed myself (or at the very least has no sea creatures in it). And I'll eat my fish with a fork, thank you very much. Here's a great recipe in case you need ideas for ways to eat fish in its solid form. I did have trouble finding a firm white fish that's sustainable but still affordable, but I finally came across cod from the U.S. Pacific, which is at least a "good alternative" according to the Monterey Bay Aquarium's standards. The flavors in this dish were mellow - I suggest adding a minced jalapeno if you're looking for something more dramatic - but I enjoyed it nonetheless. The crunch of the water chestnuts was the perfect contrast for the flaky fish, and I wouldn't recommend making this without them. It doesn't necessarily live up to "real" Thai food, but considering that it took about 10 minutes to make, it was a great substitute.
Thai fish curry with brown rice (adapted from Whole Grains for Busy People)
(Printable version)
1 can (13.5 oz.) light coconut milk
1/2 cup water
1 tsp fish sauce
2 tsp green Thai curry paste
pinch of sugar
1 cup corn kernels (frozen are fine)
1 can (8 oz.) water chestnuts, drained and sliced
1 lb. firm white fish (I used cod, but halibut also works), cut into bite-sized chunks
1/3 cup cilantro, chopped
zest of one lime
3 cups cooked brown rice
Combine coconut milk, water, fish sauce, curry paste, and sugar in a large saute pan, and bring to a boil. Then stir in the corn, water chestnuts, and fish, making sure that the fish pieces are almost completely submerged in the sauce. Cover the pan, reduce heat to medium, and cook until the fish is cooked through (about 4 min), stirring occasionally. Stir in the cilantro and lime zest, and serve over rice. Serves 4.
Subscribe to:
Posts (Atom)


