Showing posts with label dessert. Show all posts
Thursday, August 12, 2010
Fig gelato recipe
I'm not generally a fan of fruit-flavored ice cream because it usually has a fake, chemically taste to me (unless we're talking about fresh peach ice cream from Dickey Farms). But gelato is another matter. I've had my fair share of gelato (while backpacking through Europe in college, I lived off of bread, cheese, peanut butter, and gelato for 10 weeks), and I always prefer the fruit flavors. My favorites are apple (I remember a particularly good version in a gelateria in Rome) and kiwi (strangely, the first thing that comes to mind is a train station in Vienna). I don't recall ever having fig gelato, but I was excited to find this recipe. I don't know that it lives up to the best gelato I've had in Italy, but it's definitely the best I've ever made. I might reduce the lime juice by half next time (it was good, but hid the fig flavor a little bit), but otherwise it was fantastic. I'm submitting this dish to Weekend Herb Blogging, which is organized by Haalo from Cook (almost) Anything At Least Once. I'm hosting this week, so make sure to send me your entries by Sunday (check the rules for details).
Fig gelato (adapted from About.com)
(Printable version)
1 lb fresh figs, stems removed (you can peel them if you want, but I didn't)
juice of 1 lime (next time I'll only use half)
1/2 cup milk
1 Tbsp honey
Combine the figs and lime juice in a blender and blend until smooth. Then add milk and honey and blend briefly, just until combined. Freeze in an ice cream maker, according to manufacturer's directions. Serves 3-4.
Labels:
dessert,
fruit,
gluten-free,
vegetarian,
weekend herb blogging
Sunday, May 9, 2010
Rhubarb and strawberry compote recipe
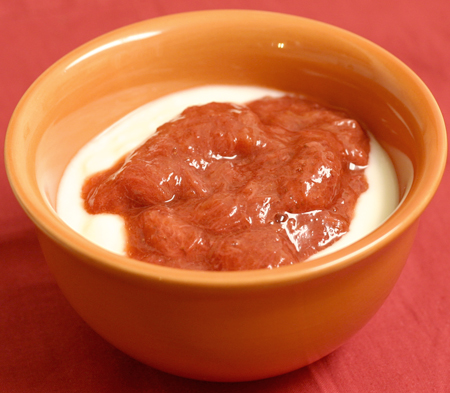
My favorite farmers' market opened last weekend, and I'm so happy to have plans every Saturday morning again. I'm trying to enjoy the spring offerings and not think about the fact that I'll move before the market really gets going. Last week I picked up rhubarb on a whim. The challenge with rhubarb is that most recipes call for tons of sugar to cancel out its sour nature. However, I really enjoy rhubarb's sourness, and I also try to avoid much added sugar. So, I decided to cook the rhubarb into a compote with strawberries (for some natural sweetness) and then added small amounts of honey until I was satisfied with the flavor. Luckily my strawberries were very sweet and in the end I didn't have to add much honey at all. I've added this compote to yogurt and oatmeal for breakfast, and I've also eaten in by itself as a dessert because it's just that good. I just finished the last of it and I'm kicking myself for not getting more rhubarb at the market this morning. I'm submitting this dish to Weekend Herb Blogging, which is organized by Haalo from Cook (almost) Anything At Least Once, and hosted by Lynne from Cafe Lynnylu this week.
Rhubarb and strawberry compote
(Printable version)
5 large stalks of rhubarb, chopped into 1/2" pieces
1 lb strawberries, tops removed and halved
1 Tbsp honey or agave nectar (to your taste)
Put the rhubarb and strawberries in a large saucepan and cook over medium-low heat, stirring occasionally. When the fruit has broken down significantly (after about 20 min), add honey or agave until it's sweet enough for you. Continue to cook for 10-20 more min. Makes about 2 cups.
Rhubarb and strawberry compote
(Printable version)
5 large stalks of rhubarb, chopped into 1/2" pieces
1 lb strawberries, tops removed and halved
1 Tbsp honey or agave nectar (to your taste)
Put the rhubarb and strawberries in a large saucepan and cook over medium-low heat, stirring occasionally. When the fruit has broken down significantly (after about 20 min), add honey or agave until it's sweet enough for you. Continue to cook for 10-20 more min. Makes about 2 cups.
Labels:
breakfast,
dessert,
fruit,
gluten-free,
honey,
vegan,
vegetarian,
weekend herb blogging
Saturday, May 1, 2010
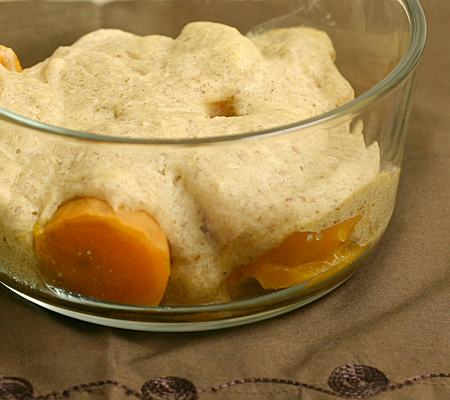
Gluten-free sweet potato cobbler recipe
I distinctly remember the first time I ate sweet potato cobbler. I was about 10 and had just enjoyed breakfast on my grandparents' porch. My grandpa Al always quizzed me about whether I had tried different foods (usually it was some uncommon fruit or vegetable, a classic southern food, or something weird he concocted). I was an adventurous eater compared to most kids, so I tried quince jelly (it was delicious), tomatoes with sugar (not my thing), and even cornbread doused in buttermilk (you should have seen the look on my face - I haven't had any buttermilk since). And all throughout breakfast that day he told us about sweet potato cobbler. I love sweet potatoes and it's hard to beat cobbler, so I was excited when he announced that he had some in the refrigerator and insisted that I try some (never mind that it was still early in the morning). As I expected, I loved it, which tickled Al to death (as my grandmother would say).
(Un)fortunately, Al passed away last weekend. He found out about a week before that he had terminal cancer, and luckily didn't have to suffer very long. I made a last-minute trip down to Atlanta to see him (hence my lack of posting), but didn't make it in time. We were all as mentally prepared as possible, but that never seems to be enough. As we reflected on our memories of Al over the weekend, it always came back to food. Al loved to garden, he loved to cook, and he LOVED to eat. I remember spending summer mornings shelling peas and beans with Al and Grandmother in the basement. Al also taught me how to make pickles. Even when he no longer had energy to spend hours in the garden or kitchen, he would give me numerous tips on growing and preserving various fruits and vegetables (I now wish I had taken notes!).
Al also won me over with food. He and my grandmother got married when I was 6, and I think we first bonded over our love of eating. Before they got married, I was out in the yard with them (likely picking up pine cones, as that's Grandmother's favorite activity), and Al said that he had something for me inside. We went in and he handed me a few Bugles (you know, those horn-shaped corn chip things). Grandmother wasn't excited about this because she thought it would spoil my dinner, but Al explained that it was just a "sample," and samples don't count. Almost every time that I saw Al, one of us would make a joke about having a sample of something and the calories not counting (sometimes the sample would be a large piece of cake, but as long as we called it a sample, it didn't exist). I was hoping to bring Al a box of Bugles last week, but oh well.
Instead, I made a sweet potato cobbler today, because I know that's what he would want me to do. Instead of using his recipe, I made a gluten-free, low-sugar version. I made a small amount because I wasn't sure how it would taste, but I loved it. It was very different from Al's, but fantastic and still reminds me of him. Now I wish I had made a big pan of it!
Sweet potato cobbler (adapted from Gluten free Mommy)
(Printable version)
1 medium sweet potato, peeled and cut crosswise into 1/3" slices
1 1/2 Tbsp sorghum flour
1 1/2 Tbsp sweet rice flour
1 Tbsp almond meal
1 Tbsp tapioca starch
1 Tbsp potato starch
2 tsp sugar
1/4 tsp salt
1/8 tsp xanthan gum
pinch of cardamom
pinch of cinnamon
1 Tbsp butter, melted
2 Tbsp orange juice
3 Tbsp milk (more or less)
1 Tbsp lemon juice
2 tsp agave nectar
1 tsp vanilla
Cook sweet potato slices in boiling water until tender (about 7 min). Then drain the sweet potato and place it in a small baking dish (I used a 4 cup round Pyrex dish). While the sweet potato is cooking, combine flours, starches, sugar, salt, xanthan gum, and spices in a small bowl. Combine the orange juice and butter, and stir this into the flour mixture. Then add enough milk so that it is the consistency of muffin batter. Sprinkle the lemon juice, agave nectar, and vanilla over the sweet potatoes, and then top with spoonfuls of the batter. Bake at 350 until the dough is set and beginning to brown (about 30 min). Serves 2.
(Un)fortunately, Al passed away last weekend. He found out about a week before that he had terminal cancer, and luckily didn't have to suffer very long. I made a last-minute trip down to Atlanta to see him (hence my lack of posting), but didn't make it in time. We were all as mentally prepared as possible, but that never seems to be enough. As we reflected on our memories of Al over the weekend, it always came back to food. Al loved to garden, he loved to cook, and he LOVED to eat. I remember spending summer mornings shelling peas and beans with Al and Grandmother in the basement. Al also taught me how to make pickles. Even when he no longer had energy to spend hours in the garden or kitchen, he would give me numerous tips on growing and preserving various fruits and vegetables (I now wish I had taken notes!).
Al also won me over with food. He and my grandmother got married when I was 6, and I think we first bonded over our love of eating. Before they got married, I was out in the yard with them (likely picking up pine cones, as that's Grandmother's favorite activity), and Al said that he had something for me inside. We went in and he handed me a few Bugles (you know, those horn-shaped corn chip things). Grandmother wasn't excited about this because she thought it would spoil my dinner, but Al explained that it was just a "sample," and samples don't count. Almost every time that I saw Al, one of us would make a joke about having a sample of something and the calories not counting (sometimes the sample would be a large piece of cake, but as long as we called it a sample, it didn't exist). I was hoping to bring Al a box of Bugles last week, but oh well.
Instead, I made a sweet potato cobbler today, because I know that's what he would want me to do. Instead of using his recipe, I made a gluten-free, low-sugar version. I made a small amount because I wasn't sure how it would taste, but I loved it. It was very different from Al's, but fantastic and still reminds me of him. Now I wish I had made a big pan of it!
Sweet potato cobbler (adapted from Gluten free Mommy)
(Printable version)
1 medium sweet potato, peeled and cut crosswise into 1/3" slices
1 1/2 Tbsp sorghum flour
1 1/2 Tbsp sweet rice flour
1 Tbsp almond meal
1 Tbsp tapioca starch
1 Tbsp potato starch
2 tsp sugar
1/4 tsp salt
1/8 tsp xanthan gum
pinch of cardamom
pinch of cinnamon
1 Tbsp butter, melted
2 Tbsp orange juice
3 Tbsp milk (more or less)
1 Tbsp lemon juice
2 tsp agave nectar
1 tsp vanilla
Cook sweet potato slices in boiling water until tender (about 7 min). Then drain the sweet potato and place it in a small baking dish (I used a 4 cup round Pyrex dish). While the sweet potato is cooking, combine flours, starches, sugar, salt, xanthan gum, and spices in a small bowl. Combine the orange juice and butter, and stir this into the flour mixture. Then add enough milk so that it is the consistency of muffin batter. Sprinkle the lemon juice, agave nectar, and vanilla over the sweet potatoes, and then top with spoonfuls of the batter. Bake at 350 until the dough is set and beginning to brown (about 30 min). Serves 2.
Labels:
dessert,
gluten-free,
vegetables,
vegetarian
Sunday, January 24, 2010
Dried fruit, nut, and coconut truffles recipe
I've alluded to the fact that I've moving and some of you have inquired about my new destination, and I can finally announce that I'll be heading back to Georgia this summer. I'm incredibly excited for many reasons: 1) I'll be very close to almost all of my family and a lot of my friends, 2) I have a job doing exactly what I want to do, 3) I won't have to put up with winter anymore, and 4) I'll be very close to Atlanta (one of my favorite cities). It's been a grueling few months of applications, interviews, and decisions (though it was nice to be in the position to have to make decisions), and I wanted to do a backflip when I called to accept the job this week. Then I realized that I don't know how to do a backflip and would most certainly end up in the hospital if I tried. So instead, I started cooking. You see, for the past month and a half, I've been gone for about half of every week. Academic interviews are a lot of fun (and I've eaten some of the most amazing food I've ever had), but they're tiring and take up an insane amount of time. I've missed my sanity, but also my kitchen.
So, it was time to try something fun. What's more fun than truffles? I had never made truffles before, but a recipe in this month's cookbook of the month caught my eye. These truffles are very different from what you normally find - they do have a subtle chocolate flavor (from cocoa powder), but mainly consist of dried fruits, including dates, and nuts. I started cooking with dates about the time I started the blog - I bought several books about cooking with natural sweeteners, and of course dates are perfect for that. I have now become hooked. My only problem with dates is that I hate chopping them, but I finally learned that the process is simplified if you cut them up with kitchen shears (just make sure to clean the blades before the date goop becomes too hard). Luckily, you don't even have to worry about chopping them in this recipe. I really enjoyed these - they're sweet, but the coconut provides the perfect contrast so that they're not cloyingly sweet. They're still slightly gooey, but harden up the longer that you refrigerate them. They were the perfect fun treat to celebrate my eventual return to the south :). I'm submitting these truffles to Weekend Herb Blogging, which is organized by Haalo from Cook (almost) Anything At Least Once, and hosted by Anna from Anna's Cool Finds this week.
Dried fruit, nut, and coconut truffles (adapted from Moosewood Restaurant Cooking for Health)
(Printable version)
1/2 cup walnuts
1/2 cup pecans
1 cup dates
1 cup dried apricots
1/2 cup dried cranberries (look for ones sweetened with apple juice)
1 cup water
2 tsp orange zest
2 tsp lemon zest
1 1/2 Tbsp lemon juice
1 tsp cinnamon
3 Tbsp cocoa powder
2 Tbsp honey
1/2 - 1 cup shredded coconut
Toast pecans and walnuts over medium heat in a dry skillet, stirring frequently. When they become fragrant (about 5-7 min), set them aside and let cool. Then pour them into your food processor and pulse until they become the consistency of a nut meal (don't overdo it). Pour this into a mixing bowl and set aside.
Combine dates, apricots, cranberries, and water in a small saucepan, bring to a boil, and then reduce heat, cover, and simmer for 10 min. Reserve the water off of the fruit and add the softened fruit to the food processor. Pulse until it becomes a paste, adding back some of the cooking water if necessary.
Add the fruit paste, zests, lemon juice, cinnamon, cocoa powder, and honey to the mixing bowl and stir well to combine. Spread out 1/2 cup coconut (you may need more later) on a small plate, and take a small piece of the mixture (about 1 Tbsp) at a time, and roll it in coconut. Place each truffle onto a parchment lined baking sheet (they're extremely sticky at this point, so keep them in a single layer). Once you have rolled out all of the truffles, refrigerate for at least an hour, and store them in the refrigerator if you have leftovers (they keep for a few weeks). Makes about 3 dozen.
So, it was time to try something fun. What's more fun than truffles? I had never made truffles before, but a recipe in this month's cookbook of the month caught my eye. These truffles are very different from what you normally find - they do have a subtle chocolate flavor (from cocoa powder), but mainly consist of dried fruits, including dates, and nuts. I started cooking with dates about the time I started the blog - I bought several books about cooking with natural sweeteners, and of course dates are perfect for that. I have now become hooked. My only problem with dates is that I hate chopping them, but I finally learned that the process is simplified if you cut them up with kitchen shears (just make sure to clean the blades before the date goop becomes too hard). Luckily, you don't even have to worry about chopping them in this recipe. I really enjoyed these - they're sweet, but the coconut provides the perfect contrast so that they're not cloyingly sweet. They're still slightly gooey, but harden up the longer that you refrigerate them. They were the perfect fun treat to celebrate my eventual return to the south :). I'm submitting these truffles to Weekend Herb Blogging, which is organized by Haalo from Cook (almost) Anything At Least Once, and hosted by Anna from Anna's Cool Finds this week.Dried fruit, nut, and coconut truffles (adapted from Moosewood Restaurant Cooking for Health)
(Printable version)
1/2 cup walnuts
1/2 cup pecans
1 cup dates
1 cup dried apricots
1/2 cup dried cranberries (look for ones sweetened with apple juice)
1 cup water
2 tsp orange zest
2 tsp lemon zest
1 1/2 Tbsp lemon juice
1 tsp cinnamon
3 Tbsp cocoa powder
2 Tbsp honey
1/2 - 1 cup shredded coconut
Toast pecans and walnuts over medium heat in a dry skillet, stirring frequently. When they become fragrant (about 5-7 min), set them aside and let cool. Then pour them into your food processor and pulse until they become the consistency of a nut meal (don't overdo it). Pour this into a mixing bowl and set aside.
Combine dates, apricots, cranberries, and water in a small saucepan, bring to a boil, and then reduce heat, cover, and simmer for 10 min. Reserve the water off of the fruit and add the softened fruit to the food processor. Pulse until it becomes a paste, adding back some of the cooking water if necessary.
Add the fruit paste, zests, lemon juice, cinnamon, cocoa powder, and honey to the mixing bowl and stir well to combine. Spread out 1/2 cup coconut (you may need more later) on a small plate, and take a small piece of the mixture (about 1 Tbsp) at a time, and roll it in coconut. Place each truffle onto a parchment lined baking sheet (they're extremely sticky at this point, so keep them in a single layer). Once you have rolled out all of the truffles, refrigerate for at least an hour, and store them in the refrigerator if you have leftovers (they keep for a few weeks). Makes about 3 dozen.
Labels:
dessert,
fruit,
gluten-free,
nuts,
snack,
vegetarian,
weekend herb blogging
Sunday, January 10, 2010
Gluten-free apple and rice bran muffins recipe
I haven't baked in months, but for some reason the excitement of being back in my kitchen motivated me to do some baking. It probably had something to do with the fact that I received the brand new Moosewood cookbook, Moosewood Restaurant Cooking for Health, for Christmas. It has lots of great recipes, including baked goods that feature whole grains and very little sugar (and some are already gluten-free!). I'm really excited about a lot of the recipes in the book, so it's going to be January's cookbook of the month.
These muffins have large chunks of apples interspersed in the bran base. I really liked the large pieces of apple, and the muffins were delicious. I had to modify this recipe to eliminate the gluten, but it turned out very well. They were dense, but reminded me of the whole wheat muffins that I made back in the day. Honestly, I think I prefer a dense muffin. I'm submitting this to Weekend Herb Blogging, which is organized by Haalo from Cook (almost) Anything At Least Once, who is also hosting this week.
Gluten-free apple and rice bran muffins (adapted from Moosewood Restaurant Cooking for Health)
(Printable version)
2 eggs, beaten
1/2 cup plain yogurt
1 tsp vanilla
2 Tbsp honey
1 large apple (I used a pink lady), chopped
3/4 cup chopped dates
1 cup rice bran (or oat bran)
1/2 cup gluten-free baking mix (or wheat flour, if you can eat gluten)
1 1/2 tsp baking soda
1/2 tsp salt
1 tsp cinnamon
1/4 cup gluten-free rolled oats
2 Tbsp flax meal
1/2 cup water (if needed)
1/2 cup chopped walnuts (optional)
Combine the eggs, yogurt, vanilla, and honey in a large bowl. Stir in the apple, dates, and rice bran. In a separate small bowl, combine the baking mix, baking soda, salt, cinnamon, oats, and flax meal. Stir this into the large bowl and combine well. If the batter is extremely thick, add water as needed (it should still be thick, not runny). Place muffin liners in a muffin tin, or lightly oil tin, and evenly divide batter between the cups (the cups will be about 2/3 full). Sprinkle walnuts on top, if desired. Bake at 375 for about 20 min, until a knife inserted in the center of one of the middle muffins comes out clean. Let cool before storing. Makes 12 muffins.
These muffins have large chunks of apples interspersed in the bran base. I really liked the large pieces of apple, and the muffins were delicious. I had to modify this recipe to eliminate the gluten, but it turned out very well. They were dense, but reminded me of the whole wheat muffins that I made back in the day. Honestly, I think I prefer a dense muffin. I'm submitting this to Weekend Herb Blogging, which is organized by Haalo from Cook (almost) Anything At Least Once, who is also hosting this week.Gluten-free apple and rice bran muffins (adapted from Moosewood Restaurant Cooking for Health)
(Printable version)
2 eggs, beaten
1/2 cup plain yogurt
1 tsp vanilla
2 Tbsp honey
1 large apple (I used a pink lady), chopped
3/4 cup chopped dates
1 cup rice bran (or oat bran)
1/2 cup gluten-free baking mix (or wheat flour, if you can eat gluten)
1 1/2 tsp baking soda
1/2 tsp salt
1 tsp cinnamon
1/4 cup gluten-free rolled oats
2 Tbsp flax meal
1/2 cup water (if needed)
1/2 cup chopped walnuts (optional)
Combine the eggs, yogurt, vanilla, and honey in a large bowl. Stir in the apple, dates, and rice bran. In a separate small bowl, combine the baking mix, baking soda, salt, cinnamon, oats, and flax meal. Stir this into the large bowl and combine well. If the batter is extremely thick, add water as needed (it should still be thick, not runny). Place muffin liners in a muffin tin, or lightly oil tin, and evenly divide batter between the cups (the cups will be about 2/3 full). Sprinkle walnuts on top, if desired. Bake at 375 for about 20 min, until a knife inserted in the center of one of the middle muffins comes out clean. Let cool before storing. Makes 12 muffins.
Labels:
books,
breakfast,
dessert,
fruit,
gluten-free,
grains,
vegetarian,
weekend herb blogging
Saturday, December 26, 2009
Sweet potato pie with gluten-free pecan crust recipe
There are a million types of pie, but my favorite is a simple sweet potato pie. I will never understand the pumpkin pie craze around Thanksgiving - to me, sweet potatoes have a much better flavor. A good sweet potato pie lets the natural sugars shine through, and only uses a bit of spices to enhance the flavor. I made this pie at Thanksgiving, and Mom requested another for Christmas. I was happy to oblige.
With tons of fresh Georgia pecans lying around the house, I decided to try out a pecan crust that I noticed over at Kalyn's Kitchen. It's SO easy, and I think I prefer it to standard pie crust. At Thanksgiving it came out perfectly, but did get a bit soggy in the middle this time. It was still delicious, though, and I'm guessing that it's because I used milk instead of half-and-half, and next time I'll go back to the thicker stuff or use a little bit less liquid. I really like the concept of this crust, and it allowed me to avoid spending lots of money stocking my parents' house with gluten-free flours. I imagine that it would be great with any nut, but I'll have a hard time straying from pecans.
Sweet potato pie with gluten-free pecan crust (filling adapted from Blue Ridge Baker and crust barely adapted from Kalyn's Kitchen)
1 Tbsp butter
1 cup pecans
2 extra large sweet potatoes (or 3 large ones)
1/4 cup honey
1 cup half-and-half or whole milk (I would reduce to 3/4 cup milk)
1 tsp vanilla
1 tsp cinnamon
1/2 tsp ginger
1/4 tsp nutmeg
1/4 tsp salt
2 eggs, beaten
Rub the butter over the bottom and sides of a 9" pie pan. Pulse the pecans in a blender a few times until they make a pecan meal consistency (don't overdo it - you don't want to make pecan butter). Pour the meal into the pie pan and press down on the bottom and sides.
Bake the sweet potatoes on a baking sheet at 400 until very tender (60-80 min, depending on the size). Let the sweet potatoes cool until you can handle them, and then peel and mash them. Measure out 2 cups of sweet potato (a little bit more is ok), and combine it with the honey, half-and-half or milk, vanilla, and spices in a large bowl. Adjust the spices to your taste, and then stir in the eggs. Pour the filling into the prepared crust and bake at 400 for 35-45 min, until it's set in the middle (jiggle the pan a little bit to check it). Let cool and serve room temperature, cold, or warm. Make sure to store leftover pie in the refrigerator. Serves 8-10.
Labels:
Christmas,
dessert,
gluten-free,
honey,
nuts,
Thanksgiving,
vegetables,
vegetarian
Saturday, December 12, 2009
Gluten-free pecan and almond cake recipe
If you're looking for a delicious gluten-free cake that is so amazing that you'll want to eat the entire thing, I have your answer. My friend Laurel directed me to this recipe, and I'm so glad that she did. The combination of the nuts and honey is unbeatable, but it's not very sweet (which is exactly how I prefer my cake). I was very impressed that the cake stayed very moist for several days, until we finally polished off every last morsel.
Almond and pecan cake (adapted from Eating Well)
(Printable version)
1 cup whole pecans, toasted*
1 cup whole almonds, toasted*
4 eggs at room temperature
1/2 cup honey
1 tsp vanilla
1/2 tsp baking soda
1/2 tsp salt
Process pecans and almonds in a blender or food processor until they are in a fine meal (don't overdo it here - you're not trying to make almond/pecan butter). You want about 2 cups of meal, so add more nuts if necessary. Separate the eggs, and beat the yolks with honey, vanilla, baking soda, and salt with an electric mixer until combined. Add the pecan and almond meal, and continue to beat until well mixed. Rinse and dry your beaters, and beat egg whites in a separate bowl for about a minute, until they're foamy and double in volume (but not to the point that they hold peaks). Fold the egg whites into the nut meal mix, and pour this into a springform pan that has been lined with parchment paper on the bottom and lightly oiled. Bake at 350 for about 30 min, until a knife inserted in the center comes out clean. Let cool for 10 minutes, and then remove the sides of the pan. Before serving, drizzle with a little bit of extra honey, if desired. Serves 10.
* To toast nuts, heat them over medium heat in a large, dry skillet. Stir frequently, until they begin to brown and are very fragrant (usually about 7-8 min).
Almond and pecan cake (adapted from Eating Well)
(Printable version)
1 cup whole pecans, toasted*
1 cup whole almonds, toasted*
4 eggs at room temperature
1/2 cup honey
1 tsp vanilla
1/2 tsp baking soda
1/2 tsp salt
Process pecans and almonds in a blender or food processor until they are in a fine meal (don't overdo it here - you're not trying to make almond/pecan butter). You want about 2 cups of meal, so add more nuts if necessary. Separate the eggs, and beat the yolks with honey, vanilla, baking soda, and salt with an electric mixer until combined. Add the pecan and almond meal, and continue to beat until well mixed. Rinse and dry your beaters, and beat egg whites in a separate bowl for about a minute, until they're foamy and double in volume (but not to the point that they hold peaks). Fold the egg whites into the nut meal mix, and pour this into a springform pan that has been lined with parchment paper on the bottom and lightly oiled. Bake at 350 for about 30 min, until a knife inserted in the center comes out clean. Let cool for 10 minutes, and then remove the sides of the pan. Before serving, drizzle with a little bit of extra honey, if desired. Serves 10.
* To toast nuts, heat them over medium heat in a large, dry skillet. Stir frequently, until they begin to brown and are very fragrant (usually about 7-8 min).
Labels:
dessert,
gluten-free,
honey,
vegetarian
Thursday, September 24, 2009
Crock pot applesauce recipe
Last week I decided that I needed to plan something fun during the weekend so that I would be able to keep myself motivated. I don't know that most people would think that apple picking is the ultimate reward for working yourself to death, but I'm not your typical person. This is my last fall in Michigan, and I have to take advantage of one of the best parts of living in this state. I found an apple picking buddy, too, so apparently I'm not the only "different" one :).
I took the parents picking in August, but there weren't many varieties available that early in the season. This time they had gala (pictured above), empire, courtland, and jonathan varieties, and I came home with a mix of all of them (and quite a few in my stomach). Before we even arrived at the orchard, I knew that I wanted to make applesauce.
Applesauce isn't very difficult to make on the stove, but I love the crock pot method because it allows me to throw the apples in the crock, go for a run, eat dinner, work on applications, and then have an amazing dessert ready at the end of the evening. A few weeks ago I had some applesauce at Zingerman's, and it was fantastic. By pure coincidence, this tasted almost exactly the same. I guess that's what happens when you rely solely on the unadulterated apple flavors. This is so simple, yet perfect. I prefer leaving the peel on, too, because it gives the sauce a fabulous color and provides a little bit of texture. I enjoyed it warm, but it's also good cold. You could throw cinnamon or honey in if you want, but I'm having trouble adding anything else because it's so good by itself. I'm already planning to make more of this to freeze, and I also want to make more with different varieties as they come into season. Hmmm... I wonder how many times I can go picking this year. I'm submitting this dish to Weekend Herb Blogging, which is organized by Haalo from Cook (almost) Anything At Least Once, and is hosted by Graziana from Erbe in cucina this week.
Crock pot applesauce (adapted from "Not Your Mother's Slow Cooker Cookbook" by Beth Hensperger and Julie Kaufmann)
(Printable version)
20 small to medium apples (ideally use a variety), cored and quartered
juice of half lemon
Toss apples in lemon juice in a large crock pot (I used a 5 1/2 qt one). Cook on low for 5 to 6 hours. Mash apples with a potato masher or ricer and try not to eat the entire crock of applesauce. Makes about 6 cups.
Applesauce isn't very difficult to make on the stove, but I love the crock pot method because it allows me to throw the apples in the crock, go for a run, eat dinner, work on applications, and then have an amazing dessert ready at the end of the evening. A few weeks ago I had some applesauce at Zingerman's, and it was fantastic. By pure coincidence, this tasted almost exactly the same. I guess that's what happens when you rely solely on the unadulterated apple flavors. This is so simple, yet perfect. I prefer leaving the peel on, too, because it gives the sauce a fabulous color and provides a little bit of texture. I enjoyed it warm, but it's also good cold. You could throw cinnamon or honey in if you want, but I'm having trouble adding anything else because it's so good by itself. I'm already planning to make more of this to freeze, and I also want to make more with different varieties as they come into season. Hmmm... I wonder how many times I can go picking this year. I'm submitting this dish to Weekend Herb Blogging, which is organized by Haalo from Cook (almost) Anything At Least Once, and is hosted by Graziana from Erbe in cucina this week.Crock pot applesauce (adapted from "Not Your Mother's Slow Cooker Cookbook" by Beth Hensperger and Julie Kaufmann)
(Printable version)
20 small to medium apples (ideally use a variety), cored and quartered
juice of half lemon
Toss apples in lemon juice in a large crock pot (I used a 5 1/2 qt one). Cook on low for 5 to 6 hours. Mash apples with a potato masher or ricer and try not to eat the entire crock of applesauce. Makes about 6 cups.
Labels:
dessert,
fruit,
gluten-free,
Michigan,
snack,
vegan,
vegetarian,
weekend herb blogging
Wednesday, September 16, 2009
Cantaloupe sorbet recipe
I've been obsessed with local cantaloupe this year, except that the farmers argue that it's not cantaloupe, but muskmelon. Mom was skeptical that they are different, and apparently she's right. I've also heard them called rockmelons at the market, which is an Australian term for cantaloupe. Who knew that our market had so many international influences? Whatever you call them, they're delicious and don't even compare to what is available in grocery stores. Last week I scored a great deal on several melons that had small soft spots. I saved one of them for this special treat.
This sorbet was amazing and incredibly sweet. In fact, if using great melons, it's probably best to skip the honey all together and rely on the natural sugar from the fruit. The taste is fabulous, it's a very refreshing treat, and it's almost too easy to make. So easy, in fact, that I managed to have a huge kitchen fiasco. As I was putting my blender jar on the counter, it slipped out of my hand and dropped on the counter, and the bottom ring broke. The food processor worked fine for this, but I was momentarily upset that I was going to have to replace my ancient blender that I inherited from my parents. Luckily the crisis has been averted, as the replacement that I ordered arrived yesterday and actually fits! Perhaps I need to test it with more sorbet??
Cantaloupe sorbet (adapted from Dawn's Recipes)
(Printable version)
1 cantaloupe (or whatever you want to call it), cut into chunks
juice of one lime
2 Tbsp honey
Combine ingredients in a blender or food processor and process until smooth. Freeze in an ice cream maker according to manufacturer's directions. Makes about 1 1/2 quarts.
This sorbet was amazing and incredibly sweet. In fact, if using great melons, it's probably best to skip the honey all together and rely on the natural sugar from the fruit. The taste is fabulous, it's a very refreshing treat, and it's almost too easy to make. So easy, in fact, that I managed to have a huge kitchen fiasco. As I was putting my blender jar on the counter, it slipped out of my hand and dropped on the counter, and the bottom ring broke. The food processor worked fine for this, but I was momentarily upset that I was going to have to replace my ancient blender that I inherited from my parents. Luckily the crisis has been averted, as the replacement that I ordered arrived yesterday and actually fits! Perhaps I need to test it with more sorbet??
Cantaloupe sorbet (adapted from Dawn's Recipes)
(Printable version)
1 cantaloupe (or whatever you want to call it), cut into chunks
juice of one lime
2 Tbsp honey
Combine ingredients in a blender or food processor and process until smooth. Freeze in an ice cream maker according to manufacturer's directions. Makes about 1 1/2 quarts.
Sunday, September 6, 2009
Peach frozen yogurt recipe
Needing to use yogurt is never a bad thing. In this case, I knew that I wanted to get more use out of my ice cream maker before I pack it away and crawl under several layers of blankets for the winter. I contemplated making frozen yogurt with some of the fruit already in my freezer, but in the end I decided on the peaches calling out to me from my counter.
I love the simplicity of this frozen yogurt. The peach flavor is strong, and provides almost all of the sweetness. This isn't your extra creamy, cloyingly sweet ice cream, but it's light, refreshing, and delicious. I imagine that the recipe would work well with other fruits, too, and I might even crank up my heat this winter to enjoy this on occasion.
Peach frozen yogurt
(Printable version)
2 cups peach slices (I left the skin on)
juice of 1/2 lime
3 cups plain yogurt
2 Tbsp honey
1 Tbsp vanilla extract
Toss peach slices with lime juice, spread them out on a baking sheet, and freeze for at least several hours (or use already frozen fruit). Combine peaches with remaining ingredients in a blender and process until smooth. Freeze according to your ice cream maker's directions. Makes about 1 quart.
I love the simplicity of this frozen yogurt. The peach flavor is strong, and provides almost all of the sweetness. This isn't your extra creamy, cloyingly sweet ice cream, but it's light, refreshing, and delicious. I imagine that the recipe would work well with other fruits, too, and I might even crank up my heat this winter to enjoy this on occasion.
Peach frozen yogurt
(Printable version)
2 cups peach slices (I left the skin on)
juice of 1/2 lime
3 cups plain yogurt
2 Tbsp honey
1 Tbsp vanilla extract
Toss peach slices with lime juice, spread them out on a baking sheet, and freeze for at least several hours (or use already frozen fruit). Combine peaches with remaining ingredients in a blender and process until smooth. Freeze according to your ice cream maker's directions. Makes about 1 quart.
Labels:
dessert,
fruit,
gluten-free,
honey,
vegetarian
Tuesday, September 1, 2009
Gluten-free, naturally-sweetened carrot cake recipe

My dad loves carrot cake, and I fell in love with the naturally-sweetened one that I made several months ago from 101 Cookbooks. I knew that Dad would enjoy one for his birthday, so I decided to try out a gluten-free version. I read several comments (both on the original recipe at 101 Cookbooks and on Twitter) that the recipe worked simply by substituting a gluten-free baking mix for the whole wheat pastry flour.
Well, I got some interesting results. This cake was moist. Very moist. I've heard horror story after horror story about gluten-free disasters that always turn out dry, so I was definitely not expecting to have the opposite problem. I checked it after an hour of baking, and it was not done. But the inside didn't appear to cook any more over the next 40 minutes. I finally gave up and took it out of the oven. It turned out ok - it tasted just as good as the gluten-filled version, but was just a moist version. After sitting in the refrigerator overnight, it firmed up somewhat and tasted even better. Mom, Dad, and I managed to eat up most of it in the two days before they left, so I'd say that it went over fairly well. Again, I prefer it without frosting - that way it's more of a sweet bread instead of a cake. In fact, I may make zucchini bread with this basic recipe.
Carrot cake (originally adapted from 101 Cookbooks)
(Printable version)
Well, I got some interesting results. This cake was moist. Very moist. I've heard horror story after horror story about gluten-free disasters that always turn out dry, so I was definitely not expecting to have the opposite problem. I checked it after an hour of baking, and it was not done. But the inside didn't appear to cook any more over the next 40 minutes. I finally gave up and took it out of the oven. It turned out ok - it tasted just as good as the gluten-filled version, but was just a moist version. After sitting in the refrigerator overnight, it firmed up somewhat and tasted even better. Mom, Dad, and I managed to eat up most of it in the two days before they left, so I'd say that it went over fairly well. Again, I prefer it without frosting - that way it's more of a sweet bread instead of a cake. In fact, I may make zucchini bread with this basic recipe.
Carrot cake (originally adapted from 101 Cookbooks)
(Printable version)
2 cups gluten-free baking mix (see below)
2 1/2 tsp baking powder
1 1/2 tsp cinnamon
3/4 tsp salt
3/4 cup walnuts, chopped
4 Tbsp butter, melted
1/2 cup dried dates, seeded and chopped
3 large ripe bananas, mashed
3 medium carrots, grated
1/4 cup unsweetened applesauce
1/2 cup plain yogurt
2 eggs, lightly beaten
Frosting (optional)
8 oz. cream cheese at room temp
3 Tbsp honey
Mix flour mix, baking powder, cinnamon, and salt in a medium bowl. Stir in walnuts. In a separate bowl, combine butter and dates. In a third bowl, combine bananas, carrots, and applesauce. Stir the butter and date mixture into the banana mix, and then add the yogurt and eggs. Add the flour mixture and stir just until everything is combined. Pour into a loaf pan that has been lined with parchment paper and lightly oiled. Bake at 350 until you get really impatient (mine cooked for 1 h 40 min, and when I stuck a knife in the middle, it still came out with a little bit of cake goo). When you take the cake out of the oven, remove the cake and parchment from the pan and let cool. If you want to frost the cake, whip together cream cheese and honey, and spread it over the top and sides of cake. Store it in the refrigerator, and it's even better cold.
Gluten-free baking mix (adapted from Karina's Kitchen)
1 cup brown rice flour
1 cup sorghum flour
2/3 cup potato starch
1/3 cup tapioca starch
1 tsp xanthan gum
Labels:
dessert,
gluten-free,
grains,
vegetarian
Friday, August 28, 2009
Fig preserves giveaway and a roasted figs recipe

I don't think that my parents realized that they were going to be in the business of hauling food back and forth between Florida/Georgia and Michigan when they decided to drive up to visit me. They arrived with 3 dozen eggs from my mom's boss and hundreds of tomatoes, a giant watermelon, 6 butternut squash, and a ton of figs from my grandparents' garden. On the way back, they were loaded down with apples and peaches, Michigan wine, and all of the gluten-filled products that were still sitting around my kitchen.
We were in somewhat of a hurry to eat the figs, because we knew that they needed to be consumed before we headed off to Toronto. While I can sit and eat dozens of figs, I thought it would be fun to do something a little bit more interesting. I didn't want to interfere with their amazing flavor, so I decided that a simple roast with honey would be a nice solution.
Roasted figs with honey
(Printable version)
20 fresh figs, ends trimmed and cut in half
2 Tbsp honey
Place fig halves in a medium baking dish and drizzle with honey. Bake at 350 until figs are soft, but haven't completely fallen apart (about 40 min). Serves 3.
These were delicious because they retained their amazing fig taste, while taking on a slightly caramelized flavor. Mom, Dad, and I gobbled these up in no time, and I bet that we would have eaten more. Oh, how I long to have access to a fresh figs on a regular basis...
And on to the giveaway...
My parents also brought a jar of fig preserves that my grandpa made from this year's harvest. He makes wonderful preserves and, as a small way of saying thanks to all of my faithful readers, I would love to share them with someone. So, just leave me a comment telling me about your favorite way to eat figs by Wednesday, September 9th, and I'll draw a random number on Thursday to select a winner. Make sure to leave me your email address if I can't access it through your blog profile. Unfortunately I can only afford to ship to them within the United States. I wish I could share a jar with all of you!!
Labels:
dessert,
fruit,
giveaway,
gluten-free,
honey,
vegetarian
Friday, July 10, 2009
Strawberry coconut ice cream recipe
I promised myself that I wouldn't buy another kitchen gadget. I'm good about keeping my promises to others, but apparently not those to myself. I've been eyeing an ice cream machine for a while now, but after weeks of fresh strawberries at the market and reading recipe after recipe for strawberry ice cream, it became more of a serious thought. One morning I was checking out the household items on Craigslist (note: not a good thing to do when you're trying to avoid buying things), and noticed that someone was selling a virtually brand new ice cream machine (the same one that I had my eye on). In a moment of weakness, I emailed her and ended up picking it up that afternoon. I'm fairly sure that when I move I'll have to get a separate U-Haul just for everything in my kitchen.Strawberry coconut ice cream (adapted from Elana's Pantry)
10 oz frozen strawberries
1 cup coconut milk
2/3 cup whole milk (or more coconut milk)
2 Tbsp honey (or agave nectar)
1 Tbsp vanilla extract
Throw everything into a heavy-duty blender and blend away. Pour into your ice cream machine and freeze according to directions (mine takes about 30 min). For firmer consistency, pour into a container and freeze for a couple of hours. Makes 1 quart.
So I've already made 2 batches of this in the last week. I think that I subconsciously "forgot" to take a picture of the first batch because I wanted to make more. I also made a mistake with the first batch and had to correct it the next time. If you have a machine that requires you to freeze the container first, make sure it is COMPLETELY frozen. Mine wasn't, despite being in the freezer for several days, and the ice cream didn't get as firm as I would have liked it, but then froze into a solid chunk after it was in the freezer for a while. It didn't stop me from shaving off chunks of the best tasting ice cream block I had ever tasted. Apparently there's only one temperature control for my whole refrigerator/freezer unit, and when it's set at a temp that's cold enough to freeze my ice cream machine, things in the fridge get icy. It's worth adjusting it just to make ice cream, though.
Anyway, about the ice cream... it's amazing! It's lighter than most, which I like because it allows the real strawberry taste to shine through. I used strawberries from my CSA share, and I definitely didn't want to hide their deliciousness. I'm going to have to do something to control my ice cream intake before the blueberries and peaches start arriving...
Labels:
CSA,
dessert,
fruit,
gluten-free,
vegetarian
Sunday, June 28, 2009
Date and oat bars
**This is not a gluten-free recipe and was posted before I eliminated gluten from my diet.**
It's wedding season, and that means endless parties (showers, bachelor/bachelorette parties, and actual weddings). Every year it seems that I have more and more weddings to attend, but I still love going. It's somewhat surprising that I would look forward to an occasion that requires dressing up (that's not my cup of tea), buying presents, and religious traditions, but somehow I always end up having a blast.Last weekend I was attending a bachelorette party in Ann Arbor. I knew that we would be hanging out at the hotel for a good part of the night, so I wanted to bring something for us to have for late-night snacks. I didn't have a whole lot of time that day, so I had to make something quick with things that I already had around.
Date and oat bars (adapted from Karen Barkie's "Sweet and Sugarfree")
2 eggs
1/2 stick butter, softened
1 1/2 cups apple juice
1 cup rolled oats
1/4 cup raisins
1/4 cup chopped walnuts
1 cup whole white wheat flour
1 1/2 cups whole wheat pastry flour
1 tsp baking soda
2 tsp baking powder
1 1/2 cups chopped dates, divided
1 tsp cinnamon
1 tsp nutmeg
1/4 tsp ginger
Beat eggs, butter, and apple juice together in a medium bowl. In a small bowl, combine oats, raisins, and walnuts. Beat 1 cup of oat mixture, flours, baking soda, baking powder, 1 cup of dates, cinnamon, nutmeg, and ginger into the egg mixture. Oil and flour a 9 x 13" pan, and pour batter into it. Top with remaining dates and oat mixture. Bake at 350 for 20 min, or until toothpick inserted in center comes out clean. Let cool and cut into squares. Makes 24 small squares.
I enjoyed these, as did the rest of the girls. I'm still nervous making sweet things for people who aren't accustomed to my fruit-sweetened concoctions, but these seemed to go over well. One of them remarked that they had the perfect amount of sweetness that would work for a dessert or breakfast. Indeed, I had a couple for breakfast the next morning. This could be varied a ton based on the dried fruits and nuts that you like and have on hand. The only thing that I would suggest is to press down the toppings into the batter slightly so that they don't fall off as you're eating them.
Labels:
dessert,
fruit,
vegetarian
Monday, June 22, 2009
Strawberries galore (gelatin and pudding showdown!)
I completely forgot that strawberry season was right around the corner. I had been reading about them for a few weeks, but I've learned to ignore a lot of things because all of the southerners are enjoying produce that I won't have for another couple of months. Then one day I showed up at the farmers' market and the strawberry ladies had appeared. Luckily I was there early because they didn't have very many that week. For some reason I only got a quart and, after lots of snacking and a gelatin recipe, it was gone two days later. The next Saturday, several people were selling strawberries, and I got two quarts. I was content with this amount, but then arrived to pick up my CSA share that Monday afternoon to find that I was getting another quart. Life couldn't get any better. Seriously, I'm not sure that I could ever have enough strawberries. Strawberries are one of the most delicate fruits, so the local ones that haven't been shipped across the country and sprayed with pesticides galore are in a world of their own. Luckily I get to join them in that world for a few weeks :)
After making the gelatin recipe (see below for that one), I decided to have a strawberry pudding showdown. My two main cookbooks for fruit-sweetened desserts each had a recipe, and they were very different. The solution? Try both.
Strawberry pudding #1 (adapted from Sharon Gerstenzang's "Cook With Me Sugar Free")1/2 cup pureed strawberries (from a scant cup of whole berries)
3 egg whites
1/4 cup apple juice concentrate
1/2 Tbsp orange juice concentrate
1/2 cup milk
2 1/2 Tbsp arrowroot powder (or cornstarch)
2 Tbsp powdered milk
1/4 tsp vanilla extract
Beat the strawberry puree, egg whites, and juice concentrates together, and set this mixture aside. Beat milk, arrowroot, and powdered milk together and pour into the top of a double boiler (or a metal bowl that fits inside a saucepan) with boiling water. Cook the mixture, stirring frequently, until it thickens, and then remove from heat and add a few Tbsp of the milk mixture to the strawberry mixture. Then put the double boiler back on the heat and gradually beat the strawberry blend into the egg mixture. Continuously beat this, while still cooking, for 10 min. Stir in vanilla extract, remove from heat, and chill. Serves 2-3.
This one was decent. It had a good taste, even though it was somewhat subtle and the orange juice taste covered up the strawberries a bit. I would leave the OJ concentrate out if I made it again. The consistency was off, too. It was right when it was done cooking, but by the time it sat in the refrigerator for a few hours, it became almost like glue. That doesn't sound appetizing at all, but I promise that it was still good.
2 cups pureed strawberries (from about 3 1/2 cups whole strawberries)
1 Tbsp + 1 tsp arrowroot powder (or cornstarch)
Blend the strawberries and arrowroot together and pour into a double boiler over boiling water. Cook until it thickens, stirring constantly (8-10 min). Then remove from heat and chill. Serves 2-3.
This one was also good, but still not perfect. I think that I preferred the flavor of this one over #1 because it was pure strawberry. But, the texture was way off. Even though it thickened after boiling, it never really got thick enough to be pudding consistency. After I would take a few bites, the remaining "pudding" would slowly slide over to cover the empty part of the bowl. Pudding isn't supposed to do this. I still ate this up rather quickly and had no regrets about making it. I guess that next time I should combine the two recipes somehow to get the right consistency.
And the real winner?
Strawberry gelatin (adapted from Sharon Gerstenzang's "Cook With Me Sugar Free")
4 tsp unflavored gelatin (2 packages)
1/2 cup cold water
1 cup unsweetened apple juice concentrate
2 cups boiling water
1 cup pureed strawberries (from a scant 2 cups whole strawberries)
Stir the gelatin into the cold water, and let sit for 3 min. Then add juice and boiling water, stir until gelatin dissolves, and add strawberries. Chill until it sets (I really have no idea how long it took, but I'm guessing several hours). Serves 6.
As a former lover of Jello, I'm appalled that this was my first homemade gelatin experience. It doesn't get much easier, and there's no better summer dessert (particularly when strawberries are involved). I LOVE this. The taste is unparalleled - so fresh and delicious. It's so much better than the stuff with the artificial flavoring and coloring (although it's practically the same color as strawberry Jello). My favorite part is that the strawberry seeds give it a fun texture and remind you that you're eating real food.
Needless to say, as soon as I had enjoyed my last bowl of pudding, I quickly made another batch of gelatin. And I'll probably end up making another this week. And perhaps the week after. And I should probably freeze some strawberries so that this can continue for a while, because I don't see myself getting tired of it anytime soon.
But here's my question: I'm almost out of gelatin, and I'm thinking about trying agar-agar (a seaweed-based gelatin substitute). Anybody used it? If so, do you have any tips?
Labels:
dessert,
fruit,
gluten-free
Monday, June 1, 2009
Naturally sweetened carrot cake
**This is not a gluten-free recipe and was posted before I eliminated gluten from my diet. **
Even though I really enjoy the challenge of trying to bake with natural sweeteners (particularly fruit), I don't end up cooking sweet things very often because savory treats are my real weakness. Don't leave me in front of a bag of tortilla chips or bowl of nuts if you want any for yourself. Seriously.But one person in my family will do just about anything for sugar (I suppose a fondness for sweets doesn't get passed down through mitochondrial DNA). I'm still trying to convince people that desserts with natural sweeteners can be just as good (and sweet) as ones laden with refined sugar. When I saw a recipe for carrot cake at 101 Cookbooks, I knew it would do the trick. Dad loves carrot cake, and Mom loves just about anything with the word 'cake' in it, so I gave this a shot while I was visiting them.
Carrot cake (adapted from 101 Cookbooks)
2 cups whole wheat pastry flour
2 1/2 tsp baking powder
1 1/2 tsp cinnamon
3/4 tsp salt
3/4 cup pecans, chopped
4 Tbsp butter, melted
1/2 cup dried dates, seeded and minced
3 large ripe bananas, mashed
3 medium carrots, grated
1/4 cup unsweetened applesauce
1/2 cup plain yogurt
2 eggs, lightly beaten
8 oz. cream cheese at room temp
2 Tbsp honey
Mix flour, baking powder, cinnamon, and salt in a medium bowl. Stir in pecans. In a separate bowl, combine butter and dates. In a third bowl, combine bananas, carrots, and applesauce. Stir the butter and date mixture into the banana mix, and then add the yogurt and eggs. Add the flour mixture and stir just until everything is combined. Pour into a loaf pan that has been lined with parchment paper and lightly oiled. Bake at 350 for about an hour (until toothpick inserted in center comes out clean). While cake is baking, whip together cream cheese and honey. After cake is done and cools, frost cake with cream cheese mixture.
Stop reading and go make this now. So much for my ability to pass on sweets! Even after eating a ton of boiled peanuts in the afternoon (I told you not to leave me alone with the nuts!) and a very filling dinner of gnocchi, I ate two pieces of this cake. Dad described this as "real carrot cake," and I agree. You could actually taste the carrots, and the cake had a very nice and somewhat dense texture (similar to that of banana bread). The frosting was good, too, and had a subtly sweet flavor that didn't send me into a sugar coma. I think this would have also been great without the frosting, but when I started to asked whether I should put it on the cake, Mom wouldn't even let me finish the question.
Speaking of the frosting, this is another great use of tupelo honey, so be sure to leave a comment on my post about grilled peaches to be entered in the drawing for the honey giveaway.
Labels:
dessert,
fruit,
honey,
vegetarian
Friday, May 29, 2009
Grilled peaches and a tupelo honey giveaway
After a huge Memorial Day meal, we needed a light dessert. I was thinking of making a simple fruit and yogurt dessert, but Mom suggested grilled peaches. Peaches are just coming into season in Georgia and South Carolina, so this seemed like the perfect idea.Grilled peaches with a balsamic reduction (inspired by The Perfect Pantry)
5 peaches, halved and pitted
1/4 cup balsamic vinegar
2 Tbsp honey (or agave nectar)
Place foil on grill (or, if your grill is very clean, skip this step). Spray peaches with olive oil and place on the foil. Grill over very low heat until the peaches are very tender and beginning to fall apart (about 20 min). While peaches are cooking, heat vinegar and honey in a small saucepan over medium heat until the mixture reduces by about half. Drizzle this over the peaches. Serves 5.
This was fabulous, and is one of my new favorite desserts. The peaches developed a great flavor after being grilled, and this contrasted fabulously with the acidic (and slightly sweet) reduction. I have a feeling that I will be making this over and over once peaches are available in Michigan.
Another honey giveaway!!
To celebrate another great recipe that I made with tupelo honey, I'm going to give away 2 more bottles. Tupelo honey is fantastic because it has a great mellow flavor and never crystallizes (see my previous giveaway for more info). So, leave me a comment about your favorite thing to do with peaches or honey, and I will randomly pick 2 winners who will each receive one squeeze bottle of tupelo honey from Florida. I'll do the drawing at 5 pm (Eastern time) on Sunday, June 7, and unfortunately I'll have to limit this to U.S. residents. Make sure to leave me your email address if you don't have a blog so that I can contact you. Good luck!!
Labels:
dessert,
fruit,
gluten-free,
grill,
vegetarian
Monday, March 30, 2009
Creamy wheat berry and honey dessert
**This is not a gluten-free recipe and was posted before I eliminated gluten from my diet.**

While flipping through Lorna Sass's whole grains book, I came across another great dessert. I loved her bulgur pudding that I made, so I knew that this would be good. And, I had some milk that I needed to use, so this seemed like the perfect opportunity to try this out.
Creamy wheat berry and honey dessert (adapted from "Whole Grains Every Day, Every Way" by Lorna Sass)
1 1/2 cups milk (whole or 2%)
1 Tbsp honey
1 1/2 cups cooked wheat berries (see below)
pinch of salt
generous pinch of cinnamon
2 Tbsp currants (or raisins or chopped dates)
Stir milk and honey together in small saucepan and bring to a boil. Stir in wheat berries, salt, and cinnamon. Return to a boil, reduce heat slightly, and let simmer for 30 min, stirring occasionally. Discard the skin that forms at the top and add currants. Continue to simmer until the mixture gets really thick (about 10 min). Serves 3.
To cook wheat berries, combine 2/3 cup wheat berries and 3 cups water in pot and bring to a b
oil. Reduce heat, cover, and simmer until wheat berries are tender (about an hour). Drain wheat berries. You can store them in the refrigerator for a few days, or the freezer for a few months.
This was very similar to the bulgur pudding, and every bit as delicious. The main difference is the texture because the berries retain their chewiness while the bulgur gets extremely soft. I love both varieties, though. I'm still crazy about wheat berries, kamut, bulgur, and every other variation of wheat that I can get my hands on. Mom told me that the bulgur pudding was one of the weirder things that I've made, but both were incredibly sweet (I promise!) and very similar to rice pudding. I'm looking forward to trying one out on her to see what she thinks. I could eat this all day, except for the fact that it's extremely filling.

This was so delicious, that I have to submit it to the Jihva for Ingredients blogging event because this month's theme is wheat. I have to celebrate and share one of my favorite grains! This month JFI is hosted by Roma at Roma's Space, and I'm excited to participate!
Labels:
dessert,
grains,
vegetarian
Sunday, March 15, 2009
Banana bread
**This is not a gluten-free recipe and was posted before I eliminated gluten from my diet.**
What do you do when you have bananas that are getting too ripe? Yep, that's right. It's banana bread time.
Banana bread (adapted from "Sweet and Sugarfree" by Karen Barkie)
3/4 cup mashed banana (I used 2 small bananas and came up slightly short, so added some unsweetened applesauce)
1/3 cup coconut oil, melted (canola oil will work too)
2 eggs
1/2 cup water
2 cups whole wheat pastry flour
1 tsp baking soda
2 tsp baking powder
1/2 tsp cinnamon
1/2 tsp nutmeg
1 cup walnuts, chopped
Beat banana, oil, eggs, and water together until creamy. Add everything except the nuts and beat well. Stir in nuts. Oil and flour a loaf pan, and pour batter in. Bake at 325 for 45 min, or until inserted knife comes out clean. Ideally, remove from pan and let cool on rack (mine was stuck to the pan). Refrigerate or freeze leftovers (which is always necessary for desserts baked without sugar).
This was delicious. Subtly sweet, as I've come to expect (and love!) from this book. And oh so nutty! I had to freeze most of it so that I wouldn't eat the whole loaf in one sitting. Fortunately (or perhaps unfortunately), it's not that hard to thaw...
Labels:
bread,
dessert,
fruit,
vegetarian
Monday, March 9, 2009
Bulgur pudding with honey and dates
**This is not a gluten-free recipe and was posted before I eliminated gluten from my diet.**
I already mentioned the first cookbook for March, but here's the second: "Whole Grains Every Day, Every Way" by Lorna Sass. I feel like I have great history with this book, even though I looked at it for the first time in September. It was my first primer in cooking the "weirder" whole grains. I really like the layout of the book. The first half is detailed info about each grain (different forms of each grain and how to cook and store each). There are tons of great tips throughout this section. The second half of the book is recipes that highlight one of the grains. So far everything I've tried is wonderful, so you'll be seeing a lot of it this month. To start off, here's a dessert I tried tonight with the little bit of bulgur I needed to use up.
Bulgur pudding with honey and dates (adapted from "Whole Grains Every Day, Every Way")
1/4 cup bulgur (fine or medium grind)
1/2 cup water
1/4 cup milk
1 tsp honey
1/2 tsp cinnamon
1/4 cup walnuts, toasted and chopped
1/4 cup dates, chopped
1 Tbsp raisins
Combine bulgur and water in small saucepan and bring to a boil. Reduce heat to medium and simmer, stirring frequently, until water is absorbed (about 5 min). Add milk, honey, and cinnamon and bring back to a boil. Simmer over medium heat until it develops the consistency of porridge (about 5 min). Stir in walnuts, dates, and raisins. Serves 2.
Wow. Delicious and very filling. It tastes like a much sweeter, nuttier version of oatmeal, and it was so good that I ate it straight out of the pan. It doesn't make a whole lot (I quartered the original recipe because I only had a little bit of bulgur left), but once I started eating it I filled up quickly and have some left for tomorrow. It's rare to find a dessert recipe in a "regular" cookbook that uses 100% whole grains and natural sweeteners, so I was sure to jump on this one. That was definitely a good decision.
Labels:
dessert,
fruit,
grains,
vegetarian
Subscribe to:
Posts (Atom)